Showing posts with label plushie. Show all posts

Sunday, March 29, 2020

Kitsune Amigurumi (Free Pattern)

Here's a cute and simple pattern for a fox amigurumi I designed. The body is worked from the legs up; the other parts are made separately and then attached.


You'll need:
  • 40 yards of worsted weight yarn (I used Knit Picks Brava)
  • 3.75mm hook (F)
  • Fiberfill
  • Yarn needle
  • Embroidery floss


Legs (make 2)

1: 4sc in magic ring (4)

2: *inc* around (8)

3-7: sc around (8) FO

DO NOT FO 2nd leg


Body

With 2nd leg on hook, ch2 and join yarn to 1st leg.

1: sc in every st around 1st leg, across ch2, around 2nd leg and back across ch2 on opposite side. (20)

2-10: sc around (20)

11: *sc in next 3 sts, dec* around (16)

12: sc in next 5, *inc in next 2 sts*, sc in next 6, *-*, sc in last sc (20)

13: sc in next 6, *-*, sc in next 8, *-*, sc in last 2 sc (24)

14: sc in next 7, *-* sc in next 8, *-*, sc in last 3 sc (28)

15-18: sc around (28) FO


Ears

Flatten the head so you have 2 rows of sc. Join yarn to one end through 1st set of 2sc.

1: sc in next 4 sts, ch1, turn (4)

2: sc, dec, sc, sl st where you joined the yarn to the head, turn (3) DO NOT ch1

3: sc, sk next st, sc, ch1, turn (2)

4: sl st in last 2 sc (2) FO

Repeat on other side and weave in ends.


Arms

1: 4sc in magic ring (4)

2: sc around (4)

3: *inc, sc* around (6)

4: sc around (6) FO, leave long tail for sewing


Attach arms to body just below rnd 11 (where you shaped the neck with decreases) and weave in ends.


Kitsune Tail (optional)

1: ch 12, join to form ring (12)

2: sc around (12)

1st Tail:

1: sc in next 4 sc, sk next 8 sc (4)

2: *inc* around (8)

3-6: sc around (8)

7: *sc 2, dec* twice (6)

8: sc around (6)

9: *sk next sc* (3) FO


2nd Tail:

1: join yarn to 2nd sc from 1st, sc in 4 sts forming a square, leaving remaining 4sc for 3rd tail (4)

Repeat rounds 2-9 to form 2nd tail


3rd Tail:

1: join to last 4 sc, sc around remaining 4 sts (4)

Repeat rounds 2-9 to form 3rd tail

Fasten Off


Attach tail to fox and weave in ends.

Wednesday, March 16, 2016

Bunny Season!

It's been a lazy couple of months so far this year, although I do have some new (now old) pictures of bunnies being dropped. Bunny season is upon us however, so I will be making and unleashing lots of bunnies in the next couple of weeks. In the meantime, here's some of the drops that happened since my last post. :)


DISCLAIMER: I do not in any way, shape or form own the Tiny Bunnies Movement. I am merely a member of the Ravelry group, which can be found here or on facebook. :)

Sunday, December 27, 2015

New Tags for a New Year!

Has it really been almost 2 months since my last post? Yikes...

Anyway, you might see an influx of posts in the near future with a bunch of bunnies being dropped. This is because I got some new tags! Hooray!


My aunt, uncle and cousin sent me a box from vistaprint for Christmas with 150-200 business cards, all containing the TBM message that I leave with my bunnies.

Aren't they neat? The card is nice and heavy, so it won't get all bent up if they get knocked around in my bag.

Over the next couple of weeks, I'll be phasing out the old tags and getting ready to drop the newly tagged bunnies. In the meantime I hope you all had an awesome holiday season. If I don't get to post some updates beforehand, I'll see you in the next year!


DISCLAIMER: I do not in any way, shape or form own the Tiny Bunnies Movement. I am merely a member of the Ravelry group, which can be found here or on facebook.

Monday, November 2, 2015

Back from Hiatus!

I am so sorry for the lack of posts in the last few months; there was some family stuff going on and I just kind of fell off track afterwards. I did leave a bunch of bunnies with family in Pennsylvania, so hopefully they all found homes!

In the meantime, I'll be at the mall tomorrow, so I'll try to leave some bunnies while I'm over there.

I hope everyone had a great Halloween! :)

Sunday, June 21, 2015

Bunny Sundae

We went out for dinner the other day, and I managed to leave a bunny at the ice cream place afterwards!


I turned back a couple of minutes later and it had already been picked up. :)

 
[The original Tiny Bunnies Movement Group can be found over here: http://www.ravelry.com/groups/the-tiny-bunnies-movement]

Saturday, May 30, 2015

Bunnies take over Whole Foods!

So yesterday I left a bunch of tiny bunnies in the aisles at Whole Foods; I believe the total count was 5.

I also left a couple of bunnies at Books-a-Million and at Pei Wei. :)

 
[The original Tiny Bunnies Movement Group can be found over here: http://www.ravelry.com/groups/the-tiny-bunnies-movement]

Wednesday, April 1, 2015

Goldfish Amigurumi Pattern (Free)


Sometime last year, I wanted to make a goldfish amigurumi. I couldn't find any patterns that I liked, so once my order of Vanna's Choice arrived in the mail that January, I set out to create my own.

After a few starts, this little guy emerged! He's super easy to make; everything is crocheted directly onto the body, so there's no attaching fiddly limbs. You can make a standard goldfish, or make an oranda by switching the main body's color to white and making an orange wen/cap to attach to the head.

For this project, you will need:

Size "G" hook (4.25mm)
Size "F" hook (3.75mm) (OPTIONAL)
Lion Brand Vanna's Choice in "goldfish" or "terracotta" (or any yarn you want to use)
9mm safety eyes
tapestry/yarn needle
fiberfill/polyfill
You will need to know how to:
single crochet
slip stitch
increase (work 2 single crochet in one stitch)
decrease (work 1 single crochet across 2 stitches)
magic ring

Ready? Let's begin.
BODY:
Round 1: Start with 6 sc in magic ring (6)

Round 2: *increase* around in each stitch (12)

Round 3: *increase in first stitch, sc in next stitch* around (18)

Round 4 - 8: sc in each stitch around (18)

-attach eyes and begin stuffing-

Round 9: *decrease across first two stitches, sc in next stitch* (12)

Round 10: sc in every stitch around. (12)

Round 11: *decrease* around (6)  Fasten Off. Weave in ends.


Dorsal (top) Fin:
Join yarn to top of goldfish body, sc in next 4 stitches down the body's length, chain 1, turn, sc in next 2 stitches, slip stitch in last 2 stitches. Fasten off, weave in ends.


 Side Fins:
Join yarn 2 or 3 rows behind each eye, sc in next st in the same row going towards the fish's belly (or in the next row going towards the eye), ch 2, sc in 2nd chain from hook, FO, weave in ends.


Now here's where you have a couple of options. As you may have noticed, the fins on the fish in the first picture are vertically placed, whereas the ones on the model directly above and below are horizontal. Both ways look cute, although I personally prefer the horizontal placing, so it's just down whichever way you like best.


vs.


Tail Fins (make 2):
Join yarn to top of back/tail end of body, ch 5, join to bottom of back, ch 1, turn, sc along row, turn, sc along next 4 sts, sl st in last stitch, FO, weave in ends.


Optional Oranda Cap:
1: With "F" sized hook, start with 4 sc in magic ring (4)
2: *inc* around (8)
3: *inc, sc in next st* around (12)

Fasten off, leaving a long tail for sewing. Attach to top of head between eyes.

And that's it! Enjoy your new fishy friend. :)


 Disclaimer: This pattern is my own property and may not be sold or distributed. Unfortunately at this time, I am not giving permission to sell items made my patterns. Otherwise, you are free to do whatever you want with the finished items. Gifts? Freebie prizes? Amigurumi army to take over the world? Go wild. :)

Friday, November 28, 2014

Happy (belated) Thanksgiving!

I hope everyone had a happy Thanksgiving! We spent the last couple of days with friends of the family over in Homosassa, and I managed to drop two bunnies over at the Homosassa Springs Wildlife Park on Wednesday. :)

I placed the first one in the Fish Bowl early on, and when we circled back it was gone, so I dropped the second one I had with me.


I also had brought a couple of bunnies to the breakfast area in the hotel Thanksgiving morning, and they found homes with a couple of girls before I could drop them!

 
[The original Tiny Bunnies Movement Group can be found over here: http://www.ravelry.com/groups/the-tiny-bunnies-movement]

Thursday, November 20, 2014

Baa Ram Ewe


Meet Yukon! He's a golden-faced ram with a soft spot for water colors. An avid con-goer, Yukon has an impressive collection of passes that he's acquired over the years. He typically hangs out by the artists' booths, but he's never quite managed to set one up himself. When he's not planning for or attending a convention, he works full time at a craft store. Ironically enough, while he can point you to every kind of paint on the market, he's not very knowledgeable when it comes to the fiber crafts. He can tell you where to find the yarn section and...that's about it.


Yukon is a test run of that sheep pattern I found yesterday-with a few adjustments. I left off a couple of increase rounds in the body, added a couple of increase rounds to the face, and added another round of single crochet to the feet. I also crocheted six stitches into the ears, instead of four. His legs ended up being placed in a really wonky position, but it doesn't detract from the cute! His eyes also turned out much better than I thought they would. :)

 
Yukon's body is made from Loops and Threads Country Loom in "Warm Cream", and his face, feet and ears are made from Lion Brand Vanna's Choice in "Honey".

Wednesday, November 19, 2014

Cottonballs With Faces

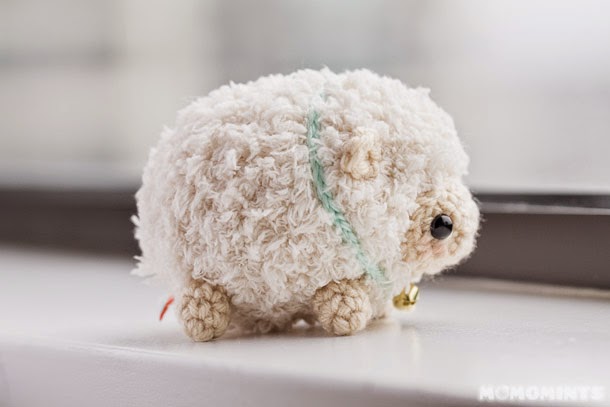
I've had a sheep on my list of amigurumi to make, and I think I might have just found the right pattern!


Photos are property of momomints.com
 
Look at dat face. How can you resist something so fluffy? So, next time I'm at the craft store, I'm stocking up on eyelash yarn! And maybe some little bells.

http://momomints.com/amigurumi-sheep-free-pattern/

Thursday, July 31, 2014

Three Bunnies Dropped!

So today while we were at the hospital, I managed to drop three tiny bunnies! And I actually managed to get a photo of one of them! Mind you, I wasn't exactly what you would call subtle while dropping and photographing it...

The quality of the photo isn't that great, but at least I got the shot.
 
The other two bunnies were dropped off on a large window sill and a waiting room table. All in all, I'd say it was a successful day in the tiny bunny area. :)

Monday, July 28, 2014

"We called him Tortoise because he taught us."

"The World is a book, and those who do not travel read only a page." -Saint Augustine
 
 
So a few days ago I suddenly wanted to make my next amigurumi a turtle or tortoise.
 
Look at this. How can you not want to recreate that face in plushie form?
 
 
After awhile I stumbled upon this pattern for a tortoise pattern, and immediately had to put in my queue. Instead of making a full sized tortoise, however, I decided to make a smaller version.
 

He's not mini, just travel sized.
 
 
This little guy was a fun project to make; I loved the idea of utilizing the fact that tortoises and turtles have actual bodies inside their shells, and attaching the limbs and head to said body. As in the original pattern, the two shells are crocheted together, and only the upper shell is crocheted on once I reached the legs/head/tail. This created a nice ridge along the shell's edge, which I left alone instead of crocheting more of an edging. I also put some extra stuffing between the body and shell.
 
...and then he promptly stuffed himself into a suitcase so he could go on an adventure.
 
 
As is usual for my projects these days, this guy is made entirely from Lion Brand Vanna's Choice yarn in "honey", "olive" and "beige". The eyes are 9 mm safety eyes, and I used a size "G" hook. It took me about two days to complete, but that was only because I started it late one day and had to resume in the morning.


Tuesday, June 3, 2014

Totoro Amigurumi Pattern


"To-to-ro? You're Totoro!"

After years of bumping it back on my queue, I actually sat down and made a Totoro amigurumi!

I'm sure the spirit of the forest needs no introduction, so I'll just say that this movie is very special to me since it was the first Miyazaki movie that I ever watched. One of my earliest memories is of watching our old, subtitled VHS copy and already being somewhat familiar with the story. And now I have my very own Totoro! As you can see, he's the perfect size to hang out in a teacup, or ride along on all your adventures.

I also wrote down the pattern as I went along this time, so if anyone else wants to make one, here's how I did it.

You will need:

Lion Brand Vanna's Choice in "Charcoal Grey" (Yarn A)
Lion Brand Vanna's Choice in "White" (Yarn B)
Size "G" crochet hook
9mm safety eyes
fiberfill stuffing
yarn needle
scissors

Stitches/techniques used:

single crochet (sc)
increase-make 2 sc in one stitch
decrease-crochet 2 stitches together, making 1 stitch. I prefer to use the invisible decrease.
magic ring/circle

Eyes (make 2)
Round 1: with Yarn B, 4 sc in magic ring (4)
Rd 2: *inc* around (8) Fasten off
Place safety eyes in middle of white circle; do not fasten backs.

Belly Patch

Round 1: with Yarn B, 6 sc in magic ring (6)
Rd 2: *inc* around (12)
Rd 3: *inc, sc in next st* around (18) Fasten off

Tail

Round 1: with Yarn A, 6 sc in magic ring (6)
Rd 2: sc around (6)
Rd 3: *inc, sc in next st* (9)
Rd 4: sc around (9) Fasten off, leaving a long tail for sewing.

Head and Body

Round 1: with Yarn A, 5 sc in magic ring (5)
Rd 2: *inc* around (10)
Rds 3-5: sc around (10) Fasten off

Repeat rounds 1 through 5-DO NOT FASTEN OFF. Chain 5,and sc in one of the sts on the 1st ear. sc in next 2 sts, chain 5, sc in 2nd stitch from the first chain, sc in next stitch. place marker. (26)

Round 6: sc in 1st stitch, dec across next 2 sts, sc around to last 7 sts, dec across 2 sts, sc in last 5 sts. (24)
Rds 7-13: sc around (24)
-attach eyes and stuff head-
Rd 14: *inc, sc in next 3 sts* around (30)
Rds 15-19: sc around (30)
-start stuffing!-
Rd 20: *dec, sc in next 3 sts* around (24)
Rd 21: *dec, sc in next 2 sts* around (18)
Rd 22: *dec, sc in next st* around (12)
Rd 23: *dec* around (6) Fasten off.


Sew up hole in top of head with mattress seam. Attach belly patch to belly; cut length of Yarn A and embroider two upside down Vs to the top of the belly. Stuff and attach tail to back. Weave in ends.


And now you have your very own Totoro! Be sure to supply him with lots of acorns and his own umbrella. :)


 Disclaimer: This pattern is my own property and may not be sold or distributed. Unfortunately at this time, I am not giving permission to sell items made my patterns. Otherwise, you are free to do whatever you want with the finished items. Gifts? Freebie prizes? Amigurumi army to take over the world? Go wild. :)